
Create Custom Nodes
@Blackprint.registerNode("Nodes/...")
class YourNodeName extends Blackprint.Node { ... }

@Blackprint.registerInterface("BPIC/Nodes/...")
class YourIFaceName extends Blackprint.Interface { ... }

Blackprint.Sketch.registerInterface("BPIC/Nodes/...", YourIFaceName);Register Interface/Node
// Define your node structure and place your code to handle the interface here
// With compatibility in mind (can be imported for Browser/Node.js)
Blackprint.registerNode('Example/Nodes/Button',
class YourNodeName extends Blackprint.Node {
    // Define output ports for this node
    static output = {
        Clicked: Function // This will be connected to other node's input port if exist
    };

    // Define input ports for this node
    // static input = { ThePortName: DataTypeHere };

    constructor(instance){
        super(instance);

	// Let's use 'BPIC/Nodes/Button interface for this node
	let iface = this.setInterface('BPIC/Nodes/Button');
	iface.title = "My Button"; // Custom node title
    }

    // Triggered from 'BPIC/Nodes/Button' interface
    clicked(ev){
        console.log('Example/Nodes/Button: got', ev);
        node.outputs.Clicked(ev);
    }
});

// Registering Interface is optional
// If you think you don't need a custom interface
// Then using registerNode is enough

// Place your code that interacting with your library or Node.js API here
class YourIFaceName extends Blackprint.Interface {
    constructor(node){
        super(node);
        this.yourCustomProperty = '...';
    }

    clicked(ev){
        console.log("Engine: 'Trigger' button clicked, going to run the handler");

        // Event route: iface.clicked -> node.clicked -> node.outputs.Clicked
        this.node.clicked && this.node.clicked(ev);
    }
};
Blackprint.registerInterface('BPIC/Nodes/Button', YourIFaceName);

// Register custom HTML interface for sketch
Blackprint.Sketch.Interface('BPIC/Nodes/Button', {
    html: `
    <div class="node {{ type || 'general' }}" style="transform: translate({{ x }}px, {{ y }}px)">
      <sf-template path="Blackprint/nodes/template/header.sf"></sf-template>

      <div class="content">
        <div class="left-port">
          <sf-template path="Blackprint/nodes/template/input-port.sf"></sf-template>
        </div>

        <div style="display: inline-block; color: yellow">
          {{ yourCustomProperty }}
        </div>

        <div class="right-port">
          <sf-template path="Blackprint/nodes/template/output-port.sf"></sf-template>
        </div>
      </div>
    </div>`
}, YourIFaceName);

// --- How to use it ---
var sketch = new Blackprint.Sketch();

let button = sketch.createNode('Example/Nodes/Button', {x: 100, y: 200});
// button is instance of (class YourIFaceName extends Blackprint.Interface)

button.clicked("'An event'"); // == iface.clicked(...)

// --- Console output ---
//> Engine: 'Trigger' button clicked, going to run the handler
//> Example/Nodes/SimpleButton: got 'An event'Blackprint is registered on window object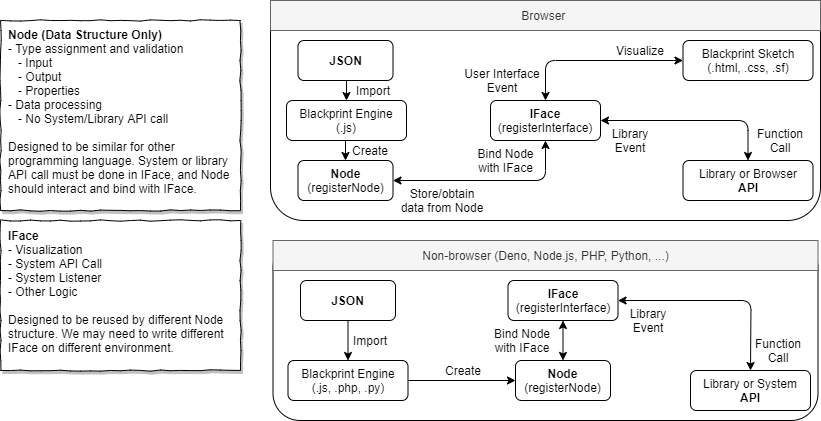
Starting the server and the compiler
Modifying the code
Compiling the code
Last updated